YouTube is a great service for storing and managing your videos. While this is handy, many people want to be able to display their videos within their own website as well. You can easily copy the embed code from YouTube and paste that into your content body field, but that only works properly if you have your text formats set up correctly, and you may not want to open that up to just anyone. You also have no way of keeping track of the videos from within your site. This is where the Media, Media Internet Sources (part of the Media package), and Media: YouTube modules can help give you a nice, seamless way to integrate YouTube videos into your site, and give really nice control over how those videos look, along with some built-in media management tools.
This tutorial, based on the free Embed YouTube Videos video from the Working with Media Module in Drupal 7 series, expects a basic understanding of the 1.x Media module. We're using 1.x because that is the current stable release, and version 2 is still in an alpha state. We're starting off with the assumption that you have a Drupal 7 site up and running, with the Media and Media: YouTube modules already downloaded and ready to go. At the end of this tutorial you will have a new video content type created, with a YouTube field that lets you paste in a YouTube video URL or embed code. We'll be diving into Media's file display settings to also make sure the embedded video displays we way we want in different contexts.
The key to making all of this work is the Media Internet Sources module, provided as part of the Media package. Without getting into lots of details, this module provides a standard mechanism for handling stream wrappers, which means you can ingest a lot of different internet services. This is a base module that you use combined with specific provider modules, which extend Media Internet Sources for use with a particular service. You can see a list of the various providers you can use on the Modules that Extend the Media Module page, under the Provider Projects section. We're focused on YouTube videos here, but you can use this same base to integrate many different services into your site.
Hands-on
So let's get started! We're going to enable the modules we need, and then build out the content type. Once that's in place, we'll grab a video URL and make our first video node. To clean things up, we'll dive into Media file display settings and make sure the video displays just the way we like it.
Create the Video Content Type
- In the Administrative menu, go to Modules (admin/modules).
- Enable the Media, Media Internet Sources, and Media: YouTube modules (located under the Media section).
- In the Administrative menu, go to Structure > Content types (admin/structure/types), and click on the "Add content type" link.
- Type Video in the Name field, and leave all other defaults. Click the "Save and add fields" button.
- Add a new field called YouTube video with the following settings:
Field name Value Label YouTube video Field Type File Widget Media file selector - Click "Save" and then accept the defaults for the Field Settings screen, and click "Save field settings." Note that we are not going to actually upload any files to this field since we're using an embed, so the upload settings can be ignored.
- Complete the Video field settings using the following values, leaving any others at their defaults:
Field name Value Label YouTube video Required Checked Allowed remote media types Video Allowed URI schemes youtube:// (YouTube videos) - Click the "Save settings" button.
Create a Video Node
Now that we have a content type, go ahead and create a new video node as you normally would, entering whatever text you want for the Title and Body fields. When you come to the YouTube video field:
- Go to YouTube.com, find a video you like, and copy either the URL or the embed code from underneath the video player, under the "Share" tab. (You can also just grab the URL from your browser's address bar.)
Image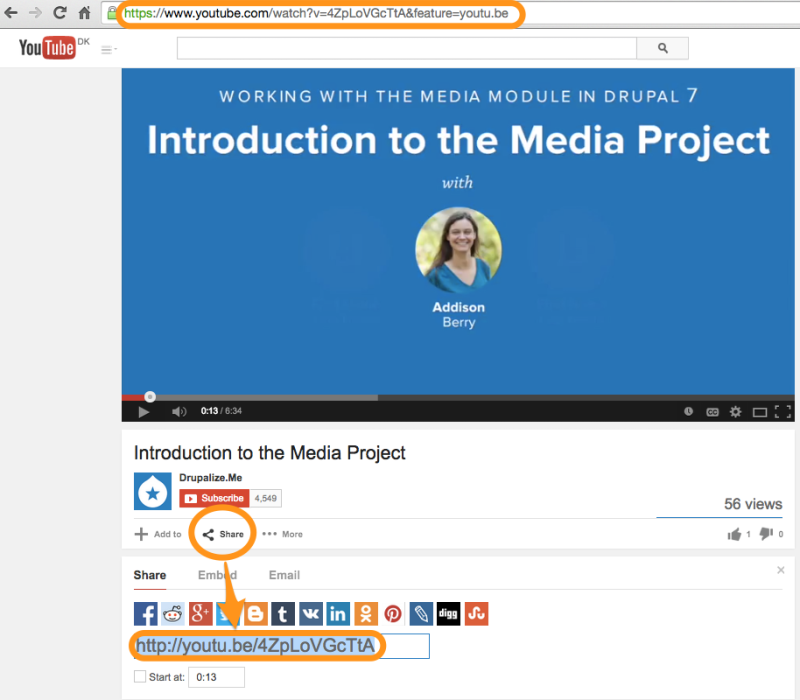
- Back on your node creation form, click the "Select media" button. This will pop open a media selector.
- Click on the "Web" tab, and paste your YouTube video information into the URL or Embed code field. Click "Submit."
- Save the node.
Fix the Video Field Display
You'll see that our video is not actually showing up as a video player, but as a link instead, so we need to go tweak the field display.
- In the Administrative menu, go to Structure > Content types (admin/structure/types), and click on the "manage display" link for the Video content type.
- Update the settings for the YouTube video field as follows:
Field name Value Label hidden Format Rendered file - Click "Save" and close the overlay. Our video is now displaying as a playable video player.
Modify the Media File Display
The content type is now working as expected, and displaying my video properly, but if you go back and edit this node, you'll notice that we have the same large player displaying on the edit form, and this is actually covering up some important functions, like being able to remove the video from the field. We'll finish this up by fixing that, and getting to understand how you can manipulate the video file display from within your own site. Much like content types, Media field types have different view modes. On a content type, these are things like Default, Full node, or Teaser. On a field type, you have Default, Preview, Large, etc. We need to fix the Preview view mode that is being shown on the node edit screen, as right now it is just falling back to the Default mode that the node is using.
One important thing to note is that the "file display" is what we are looking for here, not "manage display." The file display digs into the file itself, while manage display for the file types lets us control meta information about the file.
- In the Administrative menu, go to Configuration (admin/config) and click the "File types" link (admin/config/media/file-types), in the Media section.
- Click "manage file display" for the Video file type.
- Click the "Preview" sub-tab to get to the settings for the Preview mode.
- Check the YouTube Preview Image option in the Enabled displays field, which will open up a Display settings section at the bottom of the page.
- Select square_thumbnail for the Image style field, and click "Save settings."
Now if you go back and edit the video node you created earlier, you'll see that the YouTube video field is showing a nice, tame square thumbnail instead of the big video player. If you wanted to change the settings for the video display on the node, you can always go into the Video file display settings and configure the Default, or other file view modes, to the size you prefer.
Summary
In this short tutorial you've built a new video content type that lets you easily embed YouTube videos, using the Media, Media Internet Sources, and Media: YouTube modules. The advantage of using Media for this is that in addition to a handy field for embedding your video, you also get the media management tools to keep track of and reuse these videos on your site, in addition to having nice, fine-grained control over the output. Media gives you display options for different kinds of files, in different contexts, or view modes, including embedded YouTube videos through the File Display settings. Hopefully this introduction not only showed you how to use embedded videos very quickly and easily, but also gave a look at different ways you can use and customize the Media package for your next project.
Comments
Great post Addison. Configuring Media can be daunting at times. I'm wondering, how much of this walkthrough still applies with Media 2.x ? Thanks!
Answering my own question. The above walkthrough mostly applies when using Media 2.x (instead of 1.x). One exception is when modifying the Media File Display in the edit form. If you use Media 1.x this is done at admin/config/media/file-types. But if you use Media 2.x this UI has moved to admin/structure/file-types. Cheers!
I have this working fine in D7.50. However, I want to specify starting at a specific time in the YT video. I'm using the share link given which gives you a start at this point indication when you check the box. But when I view the video it still shows starting at the beginning. How do I correct this? Thanks!
Add new comment