After watching the Driesnote earlier this week, I wanted to try and play around with the AI tools that were demonstrated. Mostly because I find this space fascinating, and I like to try and see what kind of goofy things I can get the robots to do. So I installed all the relevant modules on a test site and played around a bit.
tl;dr; It’s got potential, but it can be equal parts helpful and frustrating. The nice thing about pre-recorded demos is you can throw away all the parts that don’t work and the ones that do can be highly scripted.
It was fun, and also super early. When it works, its kind of like magic. But it often doesn’t work. Like anything LLM related, it’s prone to making things up (it often came back with WordPress instructions). Behind the scenes, it’s doing things like asking the LLM to return structured data with very specific formatting, but sometimes the LLM just responds with long winded prose instead.
So far, I’ve only experimented with the AI Agents for things like Drupal site building tasks. The suite of modules comes with lots of other features for things like content generation, copy editing, and more, that I haven’t tried yet.
If you want to try it too, here's what you'll need to do.
Create your own Drupy assistant
First, you need to install a few modules.
- AI (Artificial Intelligence): This module provides the framework that the ecosystem of AI modules is built on. Including an abstraction layer for providers (Open AI, Anthropic, Mistral, Hugging Face, etc.), and API for creating assistants like chatbots, and APIs for integrating with other Drupal core content and configuration management features.
- AI Agents: Provides a suite of AI agents that can be used in conjunction with the AI assistants framework from the AI module to empower assistants like a chatbot to take explicit actions. Think of these as the layer that interprets between the response generated by the assistant and the actual Drupal API code for creating a field or a view.
- Unstructured: This module is a dependency of the AI agents, and allows for the use of non-plain text documents (PDF, Images, etc.) as context for the AI assistants. Essentially, ask the AI to read a PDF. You can actually get most of the functionality to work without configuring this, but it is a hard dependency.
- Key: The Key module is used for safely handling storage of API keys and other secrets and is a dependency of the AI module.
Install them all with the following command:
composer require drupal/ai drupal/ai_agents drupal/unstructured
Each of these projects actually consists of a bunch of modules, and you’ll need to enable quite a few of them to get things working. Here are the ones that I enabled:
- ai
- ai_content
- provider_openai
- ai_agents, ai_assistant_api
- ai_content_types
- ai_views
- ai_chatbot
- unstructured
drush en ai ai_content provider_openai ai_agents ai_assistant_api ai_content_types ai_views ai_chatbot unstructured
Note: I chose OpenAI as the provider because it’s commonly used, I already have an account, and I'm familiar with their API key system. In theory, this will work with others as well, but I haven’t tried it.
Configure the OpenAI provider
For this you’ll need an Open AI API key. Note that this will require payment (relatively minimal, I’ve spent less than $1 in my experiments so far today), and is not the same things as a ChatGPT key.
- Navigate to Configuration > System > Key and choose the Add key option.
- Give the key a name like OpenAI key, set the type to Authentication, and the provider to either Configuration or File. I choose file, and placed my key in a text file (/keys/openai.key) in the root directory of my Drupal project, and then set the file location to
../keys/openai.key. Assuming this is just a local development site and you’re not planning any kind of deployments using this configuration should work just fine. - Navigate to Configuration > AI > Provider settings. Choose the Open AI provider, and on the configuration form select the key you created in the previous step and press Save configuration. The first time you do this you’ll see a bunch of success messages informing you that the AI module just automatically configured Open AI as the default provider to use for a bunch of different tasks. This could be changed later, but I never ended up touching it.
Create an AI assistant
Next you need to create an AI Assistant. Basically, this is the chatbot that you’re going to interact with. This requires creating the assistant and configuring it to make use of the various AI agents that allow it to perform Drupal administration tasks like changing configuration or creating views. The current version of the module assumes that you’re creating assistants for performing RAG (Retrieval-Augmented Generation) operations, like searching your site's content, so you’ll end up changing a lot of the defaults. But it’s not too hard.
Navigate to Configuration > AI > AI Assistants and choose Add AI Assistant. Enter the following into the fields on the resulting form:
- Label: “Drupal Site Building Helper”
- Description: “An assistant that can help with Drupal site building and configuration tasks.”
- Prompt: “You are an assistant helping a human site administrator on a Drupal website with site building and configuration tasks.”
- Assistant Message: “Based on the data you get back from the agents, give a short and concise answer back to the user. Please use paragraphs, bolded and italic texts and lists to make the answer more readable.”
- Enable Agent Actions, and turn them all on.
- Press Save.

After saving, you’ll need to do some additional advanced configuration. We need to override the default Pre Action Prompt for the assistant. This is basically instructions and context for the LLM that tells it about the kinds of things it can do and how to interact with users. Like I said before, the default is oriented towards RAG usage, and we need to swap that with one that can also work with agents.
This field isn’t editable out-of-the-box, so first you’ll need to add the following to your settings.php file.
$settings['ai_assistant_advanced_mode_enabled'] = TRUE;
Then, go back to Configuration > AI > AI Assistants, and edit the assistant you just created. In the Advanced settings fieldset the Pre Action Prompt field should now be editable. Copy the contents from the file web/modules/contrib/ai_agents/resources/pre_action_prompt.txt and use it to replace the existing Pre Action Prompt. Then save.
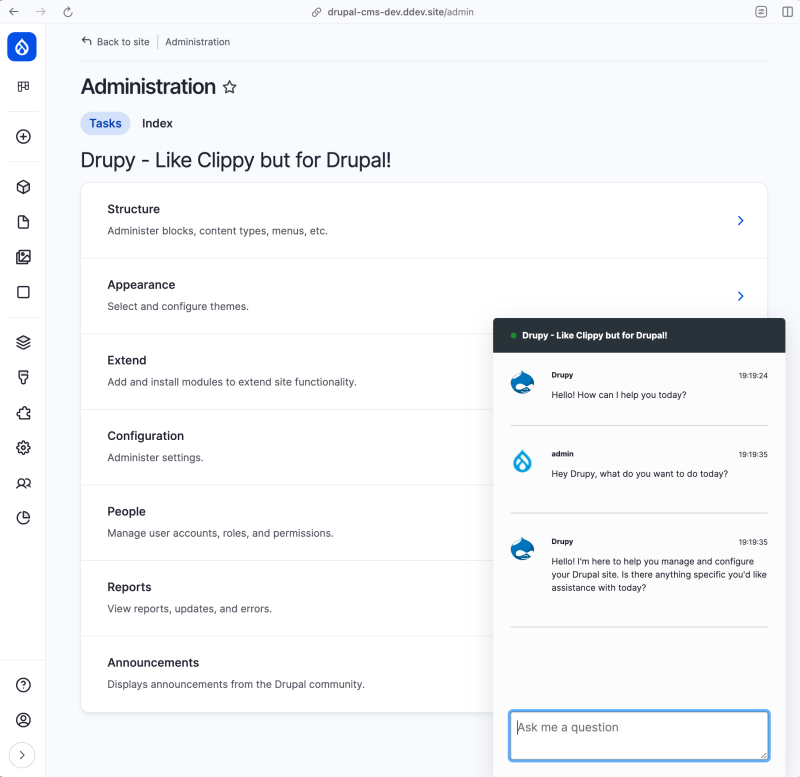
Add the chatbot to the page
The last step is to add the AI Assistant block to the page. Since this chatbot is intended for administrators, let's add it to the Content region of the admin them. Gin, in my case.
Navigate to Structure > Block layout and choose the tab for your admin theme. Then press the Place block button for the Content region. Choose the AI Chatbot block from the list and configure it. You can leave the defaults, or change them if you want to give the bot a different name, for example.
You should now see the chatbot tab at the bottom of all administration pages, ready try out.
Tip: If you’re not getting the results you want, try playing around with the assistant's Pre-prompt system role and Assistant message settings.
Additional resources
- There’s a great video walkthrough of setting things up on on the Drupal AI videos channel https://www.youtube.com/watch?v=hptyElqmo6Q (YouTube.com)
- Drupal AI (Artificial Intelligence) project page (Drupal.org)