This guide has the following assumptions and prerequisites:
- This guide covers the current major version of the core software.
- This guide is organized into topics; see Section i.3, “Organization” for details. Many topics include a Prerequisite knowledge section, which lists other topics whose content knowledge is needed in order to understand the topic you are reading. Some background knowledge that is not covered in the guide is also assumed; see Section i.2, “Audience and Goal” for details.
- Many task topics list Site prerequisites, which are tasks that you’ll need to have completed on your site before you’ll be able to do the task in the topic you are reading.
- The specifics of the site prerequisites relate to the scenario used throughout this guide of building a site for a farmers market (see Section i.6, “Guiding Scenario” for details). You can adapt the tasks to your own scenario, but you will also need to remember the changes you made when deciding if your site satisfies the site prerequisites for a task.
- For all task topics after Section 3.7, “Running the Interactive Installer”, there is also an implicit prerequisite: you must have installed the latest stable version of the content management software on your site, and be logged in to a user account with sufficient permissions to do the task (such as the user account created when you installed your site, which automatically has full permissions).
- If you read all the topics in order, and perform all of the steps in the task topics as you go (staying logged in), you should have the background knowledge and site prerequisites in place for each topic as you read it.
- This guide demonstrates how to perform tasks using the administrative user interface, and wherever possible, also using the latest stable version of the Drush command-line tool (see Section 3.3, “Concept: Additional Tools”). You can feel free to only use the administrative interface depending on your preference.
The following conventions are used in the text of this guide:
- The URL example.com means the base URL of your website. See the Navigation section below for more details on how URLs internal to your site are indicated.
- Text you should see in the user interface of your site is shown in italics, such as: Click Save configuration. This only applies to text in the user interface that comes from the software, not to text that was entered in a previous topic. For example, in a topic about editing, you might see this instruction: Click Edit in the row of the About page (Edit would be in italics, but About would not be, because the About page was created in a previous topic).
- URLs, file names, and newly-introduced terminology are also shown in italics.
-
Text that you should type at a shell command line is shown in monospace type, such as:
drush cache:rebuild
- Within this guide, the word directory is always used to refer to file directories (which some people prefer to call folders).
To do most of the task topics in this guide, you will need to navigate to one or more pages in the administrative interface of your site. You might see something like this in the instructions (this will make more sense after you have the base software installed):
In the Manage administrative menu, navigate to Structure > Taxonomy (admin/structure/taxonomy).
Navigation instructions like this assume that you have the core Toolbar module installed, and this example means that in the menu bar at the top of your site, you would need to click Manage to expose the menu choices, then click Structure, then Taxonomy, and that at the end, you would be on a page with URL http://example.com/admin/structure/taxonomy (if your site base URL is http://example.com).

Here’s another example:
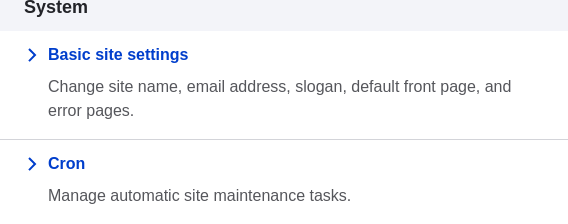
In the Manage administrative menu, navigate to Configuration > System > Basic site settings (admin/config/system/site-information).
In this example, after clicking on Manage and Configuration, you would need to find the System section of the page, and within that, click Basic site settings. After that, you’d end up on http://example.com/admin/config/system/site-information.

One other note: if you are using the standard administrative core Seven theme, many "Add" buttons in the administrative interface are displayed with + signs on them. For instance, on admin/content, the Add new content button appears as + Add new content. However, this is theme-dependent and is not really part of the text on the button (for instance, it would not necessarily be read by a screen reader), so in this guide, the convention is to not mention the + sign on the buttons.
Many of the task topics in this guide include steps where you will fill out a web form. In most cases, a screen capture image of the form will be included, along with a table of the values you will need to enter into each form field. For example, you might see a table that starts out like this, explaining the site information form you would see if you navigated to Configuration > System > Site information (admin/config/system/site-information):
| Field name | Explanation | Example value |
|---|---|---|
|
Site details > Site name |
Name of your site |
Anytown Farmers Market |
To use this table, find the field labeled Site name in the section that is under Site details in the form, and enter the name of your site in this field. An example site name of "Anytown Farmers Market" is suggested in the table, which relates to the scenario of building a website for a farmers market that you’ll find all through this guide (see Section i.6, “Guiding Scenario” for details). Also note that on some forms, you might have to click a section title (like Site details in this example) to expand the section and find the field it contains.
Attributions
Written/edited by Jennifer Hodgdon.
